
Support Centre
Find the answers to your questions and get the support you need with the VentraIP help centre.
Browse by Popular

Domain Name
- What is a domain name?Eligibility criteria for registering .AU domain namesPremium domain names explained

Web Hosting
View All
Email Hosting
View All
Google Workspace
- Getting Started with Google WorkspaceGoogle Workspace support resourcesTransferring an existing Google Workspace service to VentraIP

Account
- How do I reset my VIPcontrol password?How do I create a VentraIP account?How can I see who accessed my VentraIP account?

Troubleshooting
- How do I clear my browser cache?Troubleshooting a ‘500 internal server' errorTroubleshooting with a ping test
Gmail (webmail) email setup
Looking to update your account settings instead? Find our guide for that here.
Note: Starting January 2026, Gmail will no longer provide support for fetching emails from third-party accounts via POP to your Gmail account, so the information contained in this guide may be outdated or the feature may not be present. For more information, please refer to Google’s post here.
Setting up your account for the first time
- Navigate to Settings in your Gmail account.

- From here, navigate to the Accounts and Import tab.
- Then, navigate to Check mail from other accounts, and click Add an email account. This will open a yellow pop-up window.
- Enter your hosted email address and then click Next.
- On the next page, there should only be one option available – “Gmailify is not available for this provider. Import emails from my other account (POP3)” Leave this selected and click Next.
- On this page, you will need to enter the following recommended settings, based on what mail service you have, and then click Add Account.
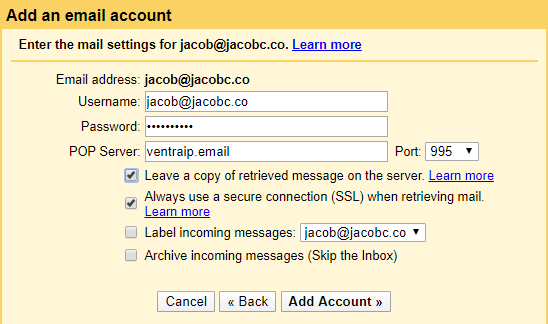
- Username: this needs to be your full email address.
- Password: the password you have created for this email account.
- POP Server: locate your email server here.
- Port: 995
- Leave a copy of the retrieved message on the server: This is optional; if you’re unsure of what to choose, then tick this option. Always use a secure connection (SSL) when retrieving mail: Ticked.
- Gmail will ask if you would like to send emails from this account as well – if you select “Yes” to this, here’s what you need to add on the next page. If you’re unsure of what you would prefer, we recommend unchecking Treat as an alias. Click Next Step.
- On the next page, you want the SMTP Server to be the same as the POP Server from Step 5, and the Username and Password should be the same as well. Select Port 465 and choose Secured connection, using SSL. Then, click Add Account.
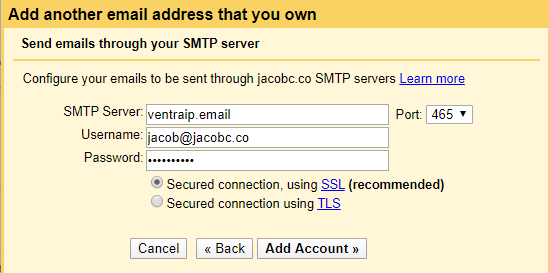
- If the next page is titled Confirm verification and add your email address, you will need to click a link in a verification email sent to you by Google. If you cannot see this yet, you can log in to your account’s Webmail through your hosting service Here’s how to find that for cPanel hosting services. You’re all set up and ready to go!
Still having issues getting set up?
Our support on issues using this software is limited – however, we want to help where we can! Please submit an eTicket and attach some screenshots of your settings for our team to review. Beyond this, please consult the internet or look into the vendor’s knowledge base.
We’d recommend taking a look at the official Google support page on this process as well.

We Are Here to Help You
Get in touch with one of our local experts at any time.
