


Browse by Popular

Domain Name
- What is a domain name?Eligibility criteria for registering .AU domain namesPremium domain names explained

Web Hosting
View All
Email Hosting
- Outlook 365 (Classic) Email Setup GuideMail app setup for iOS (iPhone + iPad)Gmail (webmail) email setup

Google Workspace
- Getting Started with Google WorkspaceGoogle Workspace support resourcesTransferring an existing Google Workspace service to VentraIP

Account
- How do I reset my VIPcontrol password?How do I create a VentraIP account?How can I see who accessed my VentraIP account?

Troubleshooting
- How do I clear my browser cache?Troubleshooting a ‘500 internal server' errorTroubleshooting with a ping test
Adding Users and Assign Licenses in Microsoft 365
This article will go over adding single users, multiple users at once, assigning licences and more!
Before you begin
Make sure you purchase the seats for the users that you would like to add or setup. If you haven’t already, you can do this via VIPcontrol > My Services > Email > Microsoft 365 > Manage > Manage Seats > and adding the number of seats for the users you plan to create.
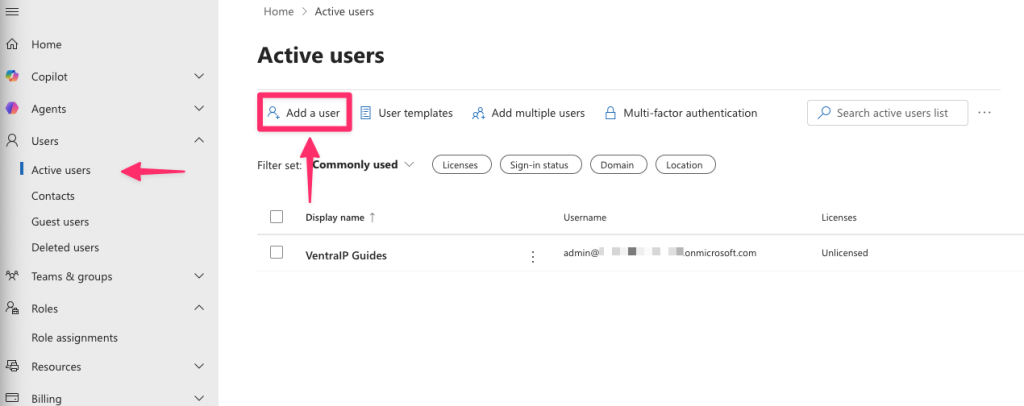
Adding a single user
- Sign into the Microsoft Admin Centre as the global administrator user
- Navigate to Users on the left side and click on ‘Add a user’ at the top.
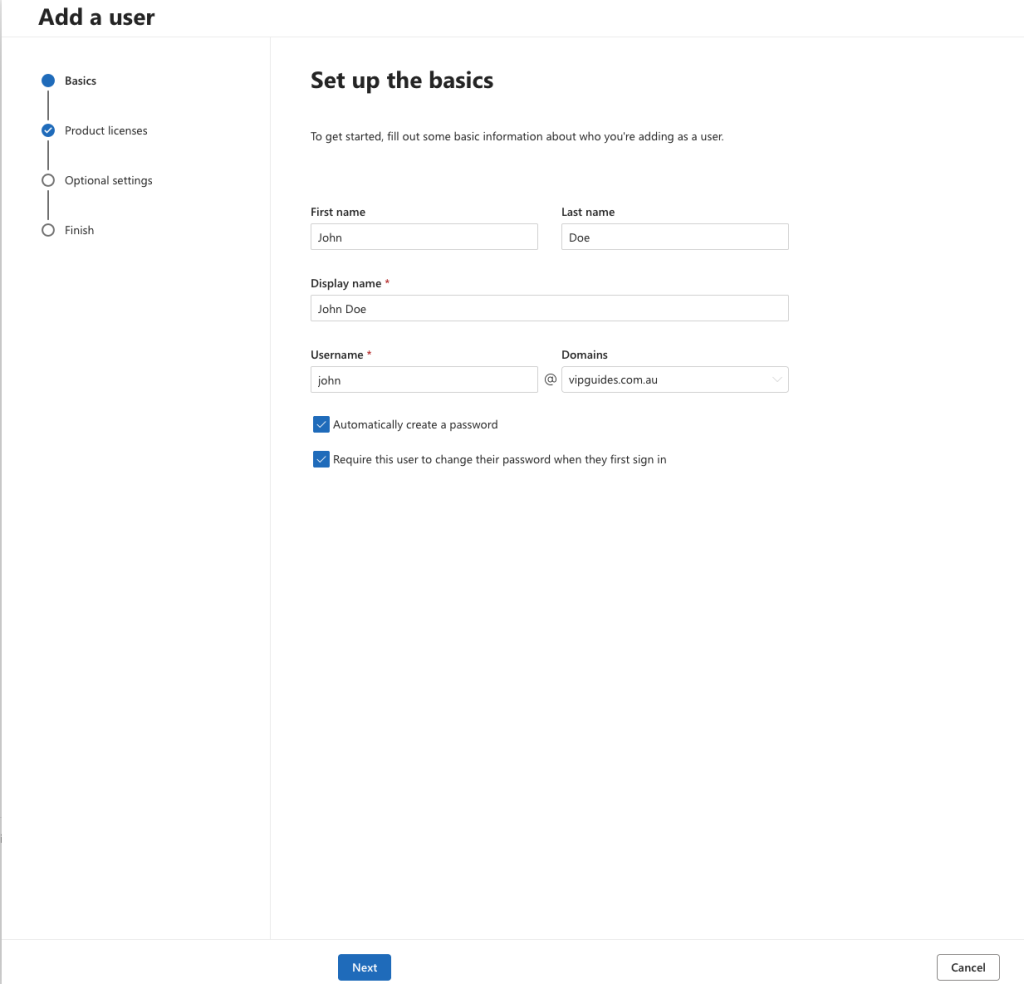
- Next, you can fill out the users basic details and click ‘Next’:
- Name: Fill in the first and last name.
- Display Name: This will be prefilled in automatically with the first and last names, if you want something custom, enter it here.
- Username & Domains: This will ultimately make up their email account and what they sign in as. For example, if the username is
johnand the domain name isvipguides.com.authen they sign in asjohn@vipguides.com.au. - Password options: By default, the option to ‘Automatically create a password’ is selected. If you deselect this option, create a strong password for the user. We also recommend the ‘Require this user change their password when they first sign in’ box checked.
- Next assign the user a licence that you would like them to have:
- If you want to limit the apps that the user can use, expand the App’s dropdown menu and uncheck or check the apps you desire.
- Optional Settings: Once you have added the optional information, click ‘Next’.
- If you would like to make the user an admin, expand the roles dropdown and select ‘Admin centre access’. You can then choose what admin roles that the user should have.
- To add more information about the user, you can expand the ‘Profile info’ dropdown and fill out the details at your leisure.
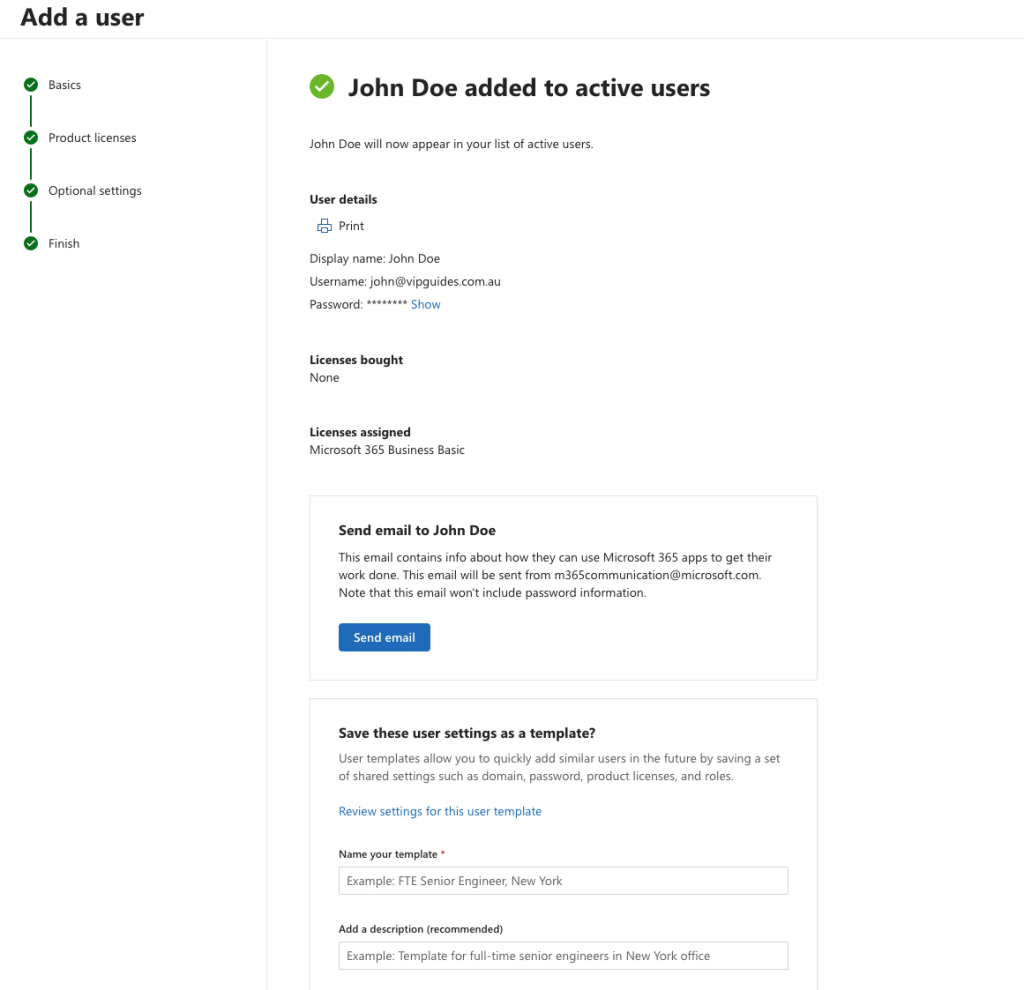
- Once you click next, you will be able to review the users settings and make any last minute changes. Click ‘Finish adding’ once all is well.
- All done! You will see a completion page which you can:
- Provide them the password either by printing it out, or sending the password to them securely
- Send them an email with setup information
- Save the user settings as a template for next time
- Choose if you would like to add another user or close the window
Adding multiple users at once
- Sign into the Microsoft Admin Centre as the administrator user if you aren’t already and go to Users > Active users, and then select Add multiple users.
- From there you can either add the users via the rows on the page, or upload a CSV with the users information.

- Next, you can select the licenses and apps to add to the users and click on ‘Next’
- You’ll then be able to do a final review of the users and make any final changes, once you’re happy, click on ‘Add users’
Bulk adding users via CSV method
If you’re adding multiple users via the CSV method you can download the example CSV file which give you a template for what details to fill out for each user and upload it to quickly add users instead of creating them one by one.
The template of the CSV to follow should be like the following:
Username,First name,Last name,Display name,Job title,Department,Office number,Office phone,Mobile phone,Fax,Alternate email address,Address,City,State or province,ZIP or postal code,Country or region
Below is an example of with sample information filled out:
Username,First name,Last name,Display name,Job title,Department,Office number,Office phone,Mobile phone,Fax,Alternate email address,Address,City,State or province,ZIP or postal code,Country or region
chrisgreen@contoso.com,Chris,Green,Chris Green,IT Manager,Information Technology,123451,123-555-1211,123-555-6641,123-555-9821,chrisgreen@contoso.com,1 Microsoft way,Redmond,Wa,98052,United States
Note: Don’t change the column headings or the order of columns, add each user line by line, with the details separated by commas.
If you wanted to omit the extra information such as their address or number, you can leave the column blank but still seperate it by columns.
An example of this is below:
Username,First name,Last name,Display name,Job title,Department,Office number,Office phone,Mobile phone,Fax,Alternate email address,Address,City,State or province,ZIP or postal code,Country or region
chrisgreen@contoso.com,Chris,Green,Chris Green,,,,,,,,,,United States
After you save and upload the CSV file, follow the steps above as normal to assign licenses and confirm your changes.
This is part three of our getting started series, to skip to a previous step you can go to the following guides below:
- Part one: Logging into Microsoft 365 for the first time
- Part two: Adding a Domain Name to Microsoft 365
- Part three: Adding users and assigning licenses in Microsoft 365
