


Browse by Popular

Domain Name
- What is a domain name?Eligibility criteria for registering .AU domain namesPremium domain names explained

Web Hosting
View All
Email Hosting
- Outlook 365 (Classic) Email Setup GuideMail app setup for iOS (iPhone + iPad)Gmail (webmail) email setup

Google Workspace
- Getting Started with Google WorkspaceGoogle Workspace support resourcesTransferring an existing Google Workspace service to VentraIP

Account
- How do I reset my VIPcontrol password?How do I create a VentraIP account?How can I see who accessed my VentraIP account?

Troubleshooting
- How do I clear my browser cache?Troubleshooting a ‘500 internal server' errorTroubleshooting with a ping test
Setting Up DKIM for Your Microsoft 365 Domain
This article will go over setting up DKIM signing for your emails through Microsoft 365.
Sign into the Defender portal and Enable DKIM
- Sign into the Defender portal as a user with Global administrator and search for “Email authentication settings” or click here to navigate there directly.
- Click on the toggle next to your domain to enable DKIM.
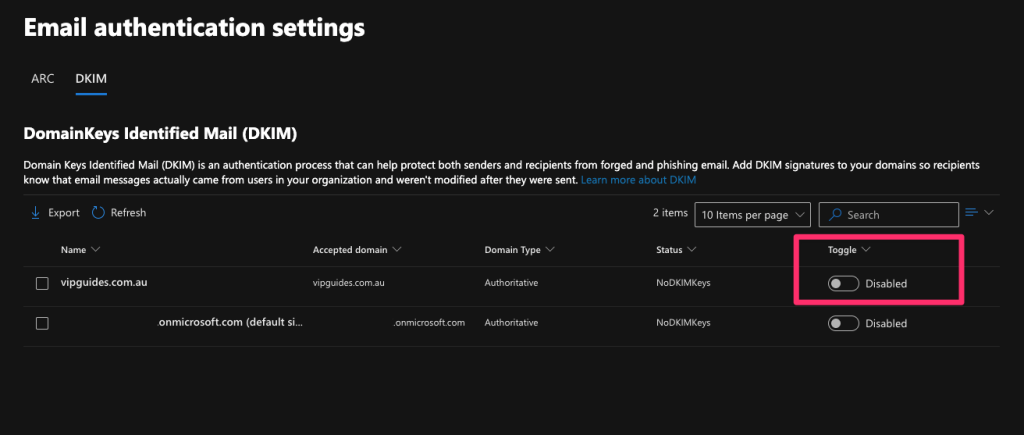
- You will get an error dialog pop up, you can close this and click anywhere in the row other than the check box next to the Name value or on the Toggle value to open the details flyout for the domain.
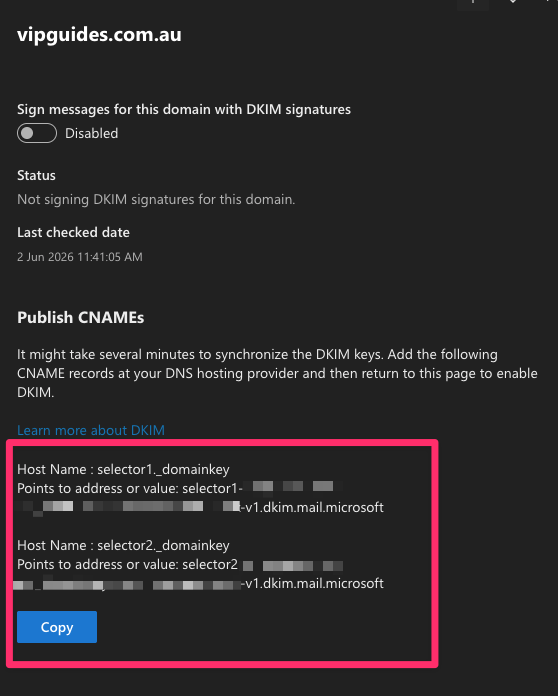
- It will ask you to add two CNAME DNS records. Leave this page open.
Add the CNAME records with your DNS hosting provider
Next we will add the two CNAME records.
Domain or hosting is with VentraIP
- Open a new tab and login to VIPcontrol and navigate to My Services → Domains and click the DNS button next to your domain.
- You should see the DNS Hosting tab selected or the VentraIP Hosting tab selected.
- Go back to the Microsoft setup page, highlight and copy the “Host Name” value using
ctrl + c(cmd + cfor Mac). - In VIPcontrol, update the record type to CNAME and paste the “Host Name” value you copied into the hostname box.
- Next, copy the value next to “Points to address or value” and paste this into the “Value” box in VIPcontrol and click on the plus icon to add the record. It should look similar to the following:
- Do the same process for the second CNAME record. Once added, allow a couple minutes or up to 6 hours for DNS propagation. Go back to the Microsoft flyover page and click the toggle ‘Sign messages for this domain with DKIM signatures‘ toggle.
- Once clicked a security dialog will open with the following text:
It may take several minutes to synchronize the status change.
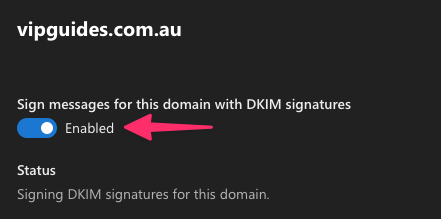
After you select OK to close the dialog, the following settings are shown on the domain details flyout if the CNAME records are detected successfully:
- The Sign messages for this domain with DKIM signatures toggle is enabled
- The status value is Signing DKIM signatures for this domain.
- Last checked date: The date and time should be more recent
Domain or hosting is with another provider
If your domain or DNS hosting is with another provider (e,g Cloudflare), please login to your providers DNS management page, copy the two CNAME and add the records in.
If you’re not comfortable adding these in, please reach out to your provider for assistance and they should be able to add them in for you.
After the CNAME records are added, Go back to the Microsoft flyover page and click the toggle ‘Sign messages for this domain with DKIM signatures‘ toggle.
Once clicked a security dialog will open with the following text:
It may take several minutes to synchronize the status change.
After you select OK to close the dialog, the following settings are shown on the domain details flyout if the CNAME records are detected successfully:
- The Sign messages for this domain with DKIM signatures toggle is enabled
- The status value is Signing DKIM signatures for this domain.
- Last checked date: The date and time should be more recent
All done! DKIM signing should be enabled under your domain to add an extra layer of validation for emails sent under your domain!
