
Browse by Popular

Domain Name
- What is a domain name?Eligibility criteria for registering .AU domain namesPremium domain names explained

Web Hosting
View All
Email Hosting
- Outlook 365 (Classic) Email Setup GuideMail app setup for iOS (iPhone + iPad)Gmail (webmail) email setup

Google Workspace
- Getting Started with Google WorkspaceGoogle Workspace support resourcesTransferring an existing Google Workspace service to VentraIP

Account
- How do I reset my VIPcontrol password?How do I create a VentraIP account?How can I see who accessed my VentraIP account?

Troubleshooting
- How do I clear my browser cache?Troubleshooting a ‘500 internal server' errorTroubleshooting with a ping test
Changing your WordPress website’s URL
If you want to move your WordPress website to a new domain name, you will need to update your website so it knows it’s now operating under the new domain. This guide will walk you through the process step-by-step.
Before You Start
Make sure you have your new domain name ready and that its DNS is configured to point to your hosting service. If you haven’t set this up yet, follow our guide on ensuring your domain name is loading from our servers first.
Method 1: Update the wp-config.php File (Recommended)
This is the quickest and easiest method. Follow these steps:
- Log in to cPanel.
- Click on File Manager under Files.
- Navigate to the folder where your website is stored (usually public_html).
- Right-click on the wp-config.php file and click Edit.
- Add the following lines anywhere after the opening <?php tag at the beginning of the file:
define('WP_SITEURL', 'https://your-new-domain.com');
define('WP_HOME', 'https://your-new-domain.com');
Important: Replace your-new-domain.com with your actual new domain name. Use https:// if your site has an SSL certificate, or http:// if it doesn’t.
- Click Save Changes.
Method 2: Update Your Website’s Database
If you prefer to update the database directly, or if Method 1 didn’t work, follow these steps.
Step 1: Find Your Database Name
- Log in to cPanel.
- Click on File Manager under Files.
- Navigate to your website folder (usually public_html).
- Right-click on the wp-config.php file and click Edit.
- Look for the line that says DB_NAME – the database name will be in quotes next to it.

Make note of this database name – you’ll need it in the next step.
Step 2: Update the Database URLs
- Log in to cPanel.
- Click on phpMyAdmin under Databases.
- Click on your WordPress database from the left sidebar, then click on the _options table.
- In the Filter rows field at the top, type your old domain name to find the rows you need to update.
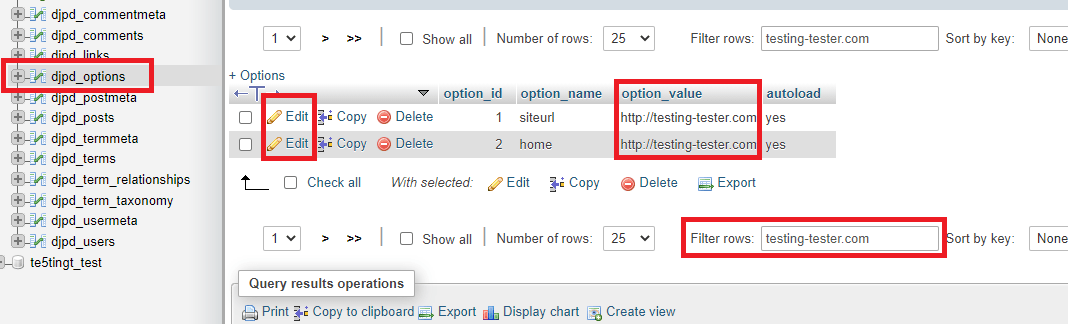
- You should see two rows:
- siteurl
- home
- Click Edit next to each row.
- Change the old domain name to your new domain name in the option_value field.
- Click Go to save each change.
Additional Steps You May Need
Fix Image Links
After changing your domain, some images may not display correctly. If this happens, follow our guide on fixing image links in WordPress.
Update Remaining References (Search and Replace)
Your database may still contain references to the old domain in posts, pages, and settings. To fix this:
- First, create a backup of your database using phpMyAdmin’s export tool.
- Install a search and replace plugin to find and update all remaining references to your old domain.
Clear Your Cache
If you have any caching plugins installed (such as WP Super Cache or W3 Total Cache), clear all caches through the plugin’s settings in your WordPress admin area (wp-admin).
Fix Elementor Links (If Applicable)
If you built your site with Elementor, you’ll need to update links using Elementor’s built-in tool:
- Go to Elementor > Tools > Replace URL tab.
- Enter your old domain and new domain, then click Replace URL.
- Go to the General tab and click Regenerate Files under Regenerate CSS.
- Double-check that the URLs in Settings > General on your WordPress Dashboard match your new domain.
Need Help?
If you run into any issues during this process, feel free to reach out to our support team through a VIPcontrol eTicket.
