


Browse by Popular

Domain Name
- What is a domain name?Eligibility criteria for registering .AU domain namesPremium domain names explained

Web Hosting
View All
Email Hosting
View All
Google Workspace
- Getting Started with Google WorkspaceGoogle Workspace support resourcesTransferring an existing Google Workspace service to VentraIP

Account
- How do I reset my VIPcontrol password?How do I create a VentraIP account?How can I see who accessed my VentraIP account?

Troubleshooting
- How do I clear my browser cache?Troubleshooting a ‘500 internal server' errorTroubleshooting with a ping test
Setting up your VNC client
When running a self-managed VPS with VentraIP you may find yourself needing to use VNC to access your server’s terminal.
VNC stands for virtual network computing, this is a desktop sharing system that allows you to remotely access and control your server from your local network.
This article will touch on reasons as to why one might need to use VNC to access a server, how you can get VNC access setup and where you can find your VNC access details with VentraIP.
When it comes down to why you may need to use VNC to access your self-managed VPS with VentraIP, generally speaking, this would be due to certain situations where traditional access to your server is not working. This might be due to your server experiencing a kernel panic; issues successfully booting, SSH is down, or where the operating system can’t quickly or easily recover. VNC access will give you direct control of your server remotely, allowing you to troubleshoot the error and or reboot the server if required.
Setting up your VNC client & Retrieving your VNC access details.
- First up, you’re going to need a VNC viewer.
- There are a number of VNC viewers you could use, our team in the office tend to use TightVNC or VNC Viewer which are both free to use!
- Install the viewer of your choice and it will be ready for your VNC access details.
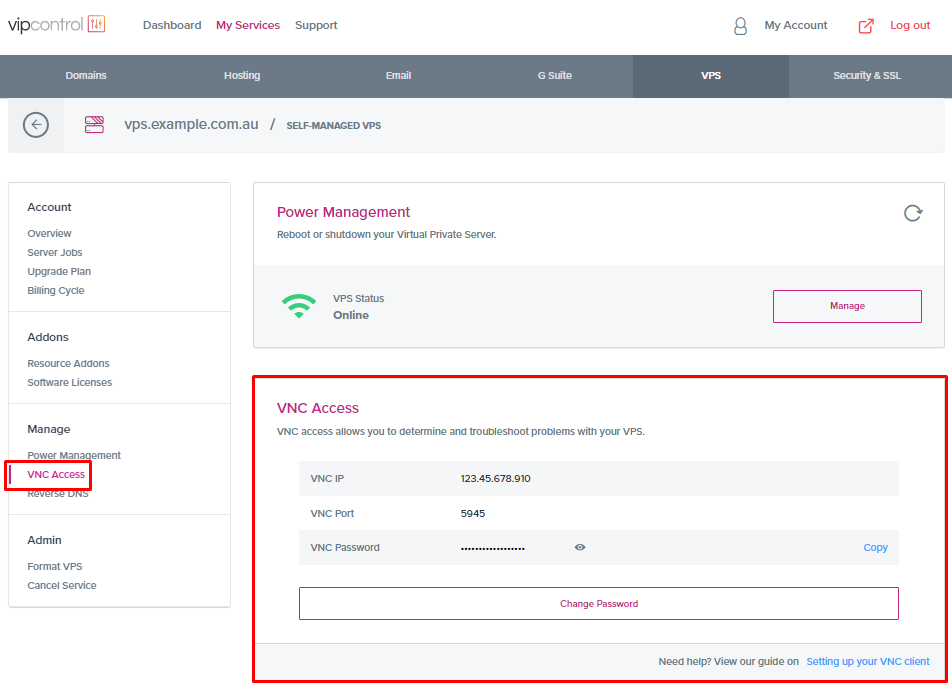
- Retrieving your VNC access details for your self-managed VPS with VentraIP can easily be done through your VIPcontrol account.
- Navigate to VIPcontrol >> My Services >> VPS >> You will be able to then click on “VNC Access” on the left-hand side of the VPS management page as you can see attached below:
- Navigate to VIPcontrol >> My Services >> VPS >> You will be able to then click on “VNC Access” on the left-hand side of the VPS management page as you can see attached below:
- Now that you have your VNC Viewer ready and your VNC access details on hand, you can now enter your details into your VNC Viewer accordingly.
- In our screenshot below, we are using TightVNC. Note, when asked for a “Remote Host” or “VNC Server address” enter in your VNC IP address followed by two colons and your VNC port number as seen below:

- In our screenshot below, we are using TightVNC. Note, when asked for a “Remote Host” or “VNC Server address” enter in your VNC IP address followed by two colons and your VNC port number as seen below:
- Once you’ve clicked connect, the next step would be to enter in your VNC Password which will in effect grant you access and control of your server via VNC.
Now that you have access to your server via VNC you can now use your root details to access the server and troubleshoot and or reboot your server!
Please note that as you’re effectively controlling another computer remotely, you will be unable to copy/paste your password, so this will need to be manually typed.
Any other queries or clarification you’d like on VNC Access?
Pop an eTicket through to our technical support team who can further assist with your queries. Our 100% local support team are here 24/7 and can also be reached via our phone line on 13 24 85 which is a free call nationally within Australia.
