


Browse by Popular

Domain Name
- What is a domain name?Eligibility criteria for registering .AU domain namesPremium domain names explained

Web Hosting
View All
Email Hosting
- Outlook 365 (Classic) Email Setup GuideMail app setup for iOS (iPhone + iPad)Gmail (webmail) email setup

Google Workspace
- Getting Started with Google WorkspaceGoogle Workspace support resourcesTransferring an existing Google Workspace service to VentraIP

Account
- How do I reset my VIPcontrol password?How do I create a VentraIP account?How can I see who accessed my VentraIP account?

Troubleshooting
- How do I clear my browser cache?Troubleshooting a ‘500 internal server' errorTroubleshooting with a ping test
Adding, removing, and managing DNS records within VIPcontrol
All domain registrations include our centralised DNS management directly within VIPcontrol. You can manage your DNS records (A, AAAA, CNAME, MX, TXT, SRV, CAA, ALIAS) through VIPcontrol, provided your domain uses our free included DNS Hosting or your cPanel web hosting service’s DNS.
Important Prerequisites & Warning
This guide is only for domains set to DNS Hosting or VentraIP Hosting. If you are unsure, please first consult our guide here.
NOTE: When enabling DNS hosting or VentraIP Hosting, all existing DNS records (A, CNAME, MX, etc.) will be immediately replaced with the records from the new nameservers’ DNS zone.
Any currently linked services (like email or website hosting) and custom records will stop working until you either pre-fill or manually recreate those records in the new DNS Zone.
Accessing your domains DNS zone
To access your domain’s DNS zone to manage DNS records, please follow these easy steps:
- Log in to VIPcontrol
- Click the “My Services” link on the top → “Domains” from the tabs underneath
- Click the “DNS” button for the domain name that you wish to edit
- From here, you will be presented with a table of your domain’s DNS records!
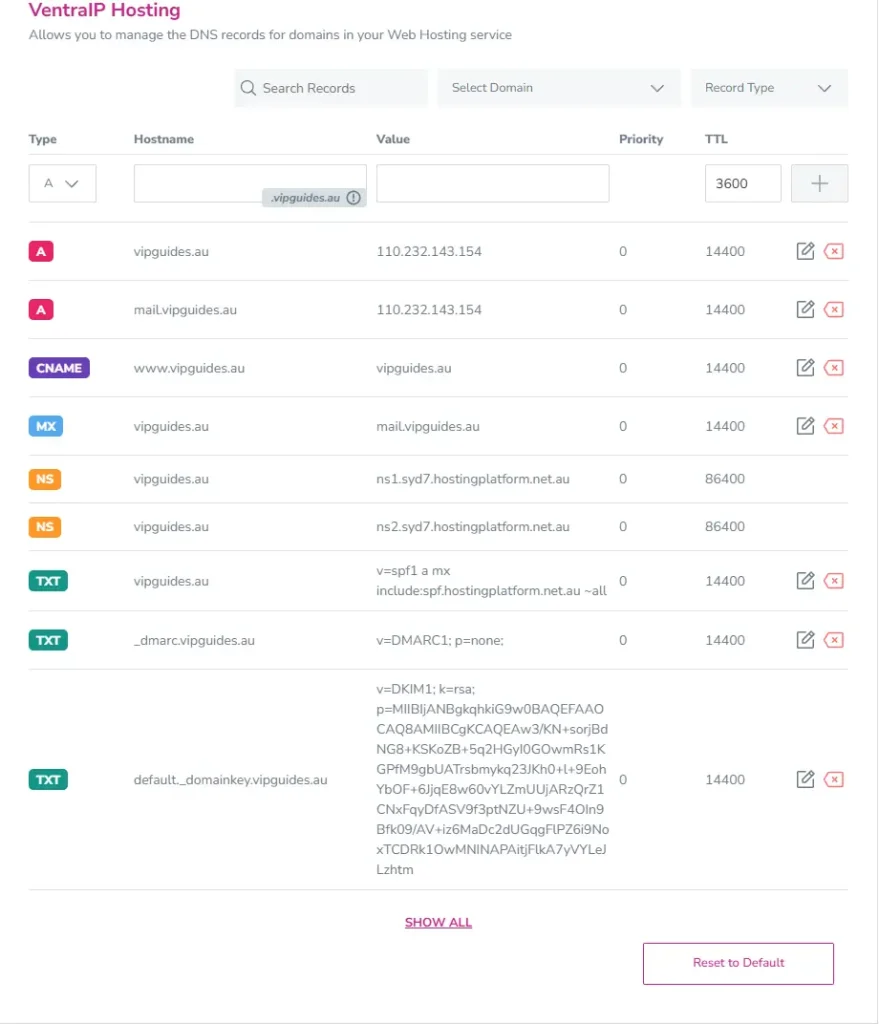
Adding a new record
To add a new record, navigate to the top of the table where your DNS records are listed, which you can fill out with the desired record and click the plus icon.
Below is what should go in each box with an example at the bottom:
- Type: Use the drop-down in the first column to change the type of record (A, MX, TXT, etc.).
- Hostname: In the first text field, add the sub-domain this applies to. Leave this blank to use the root domain. (e.g. yourcooldomain.com.au).
- Value: In the second text field, enter your “value”. This could be an IP address, a text string or another domain name.
- Priority: Applies to MX type records only. Mail will prioritize delivering to the MX records that have the lowest priority.
- TTL: We recommend leaving this as the default value. This is the “time-to-live” for your DNS record before a DNS server will check the zone again for updated information – measured in seconds.

Changing and removing DNS records
Click the pencil icon to edit an existing one. Click the red “x” button next to a record to remove it from the zone.

DNS presets
Scrolling down the page you will see the “DNS Presets” section. This option allows you to quickly add a preset for third-party apps or hosting.
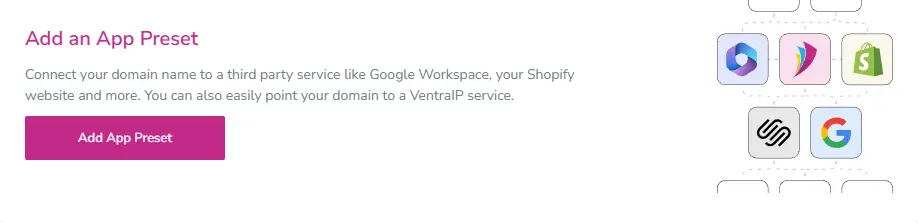
If you select this, you will be given the choice to automatically add the required records for some email hosting providers that you may be using – such as Google Workspace, Microsoft 365 and our own VentraIP Email Hosting.
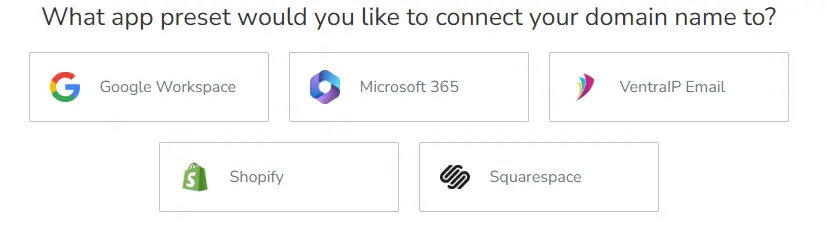 Here you can select the offering you need and click Apply DNS Preset to have the DNS records automatically added.
VentraIP Hosting specific options
If you have your domain set to VentraIP Hosting, you will have a few more options when managing DNS records:
- Manage Addon Domains’ DNS: You can manage the DNS records for any of the domains in your Web Hosting Service

- Show all DNS records toggle: By default, we have hidden the default cPanel service subdomains DNS records. To view all records, you can click on “Show All” at the bottom of the DNS table.
If you prefer to use cPanel’s Zone Editor to manage the DNS records directly within your web hosting service, you can use this guide here to do this.
Important Information
Once you have made any DNS changes, please allow 2-6 hours for DNS to propagate around the world for any DNS updates to reflect and you should be all good to go!
If you need any help with updating your nameservers or DNS records, or just need a confirmation that the changes that you’re making won’t disrupt any services, please feel free to reach out to our support team and we are more than happy to help!
