


Browse by Popular

Domain Name
- What is a domain name?Eligibility criteria for registering .AU domain namesPremium domain names explained

Web Hosting
View All
Email Hosting
- Outlook 365 (Classic) Email Setup GuideMail app setup for iOS (iPhone + iPad)Gmail (webmail) email setup

Google Workspace
- Getting Started with Google WorkspaceGoogle Workspace support resourcesTransferring an existing Google Workspace service to VentraIP

Account
- How do I reset my VIPcontrol password?How do I create a VentraIP account?How can I see who accessed my VentraIP account?

Troubleshooting
- How do I clear my browser cache?Troubleshooting a ‘500 internal server' errorTroubleshooting with a ping test
Adding domain redirects using VIPcontrol
Enabling Free DNS Forwarding
- First, to enable redirects through VIPcontrol you need to head over to My Services, and then click Domains.
- Then, click Manage next to your domain, and then click Manage DNS on the left.
- Click on the Forwarding tab
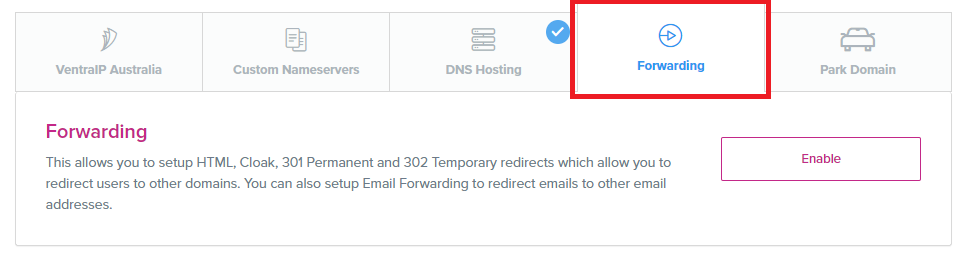
- Click Enable
PLEASE NOTE: This will change your current DNS configuration. This method is best used when your domain name does not have any hosting, or if you are planning on canceling your hosting for that domain name in favor of a new website. If your domain name is already configured to point to a hosted website, it is best to set up redirects through your web hosting.
301 Redirect Permanent
This is the most common type of redirect – 301 is the HTTP code given to your web browser when processing the redirection, and to search engines when indexing your website.
Some common uses for this type of redirect are:
- Redirecting traffic from http://www.yourdomain.com to http://yourdomain.com or vice-versa (depending on whether you prefer to use the “www.” subdomain or not)
- Directing traffic from alias domains to your ‘main’ website/domain
- To fix broken links across your website
When choosing this option, you should fill it out as follows:
- Source Address: Leave this section blank to use your root domain or add a sub-domain here if one is involved in your ‘from’ address. Keep in mind that ‘www.’ counts as a sub-domain.
- Destination Address: Add your full destination URL here, including the protocol (http:// )
302 Redirect Temporary
This type of redirect works in the same way as 301 Redirect Permanent but sends a different HTTP code (302) to browsers and search engines instructing them not to update their cache/index with the new link. As the name implies, this type of redirect is suited for temporary changes to your website.
Fill this out the same as you would for 301 Redirect Permanent (above).
HTML Redirect
HTML is an old-fashioned form of redirection and isn’t used much any more. We have this option available to those who prefer to use this method! HTML Redirects don’t update SEO indexing, so it is best likened to a 302 Temporary Redirect. A popular use for this type of redirect is to add a delay before being redirected to the new URL.
When choosing this option, you should fill it out as follows:
- Source Address: Leave this section blank to use your root domain or add a sub-domain here if one is involved in your ‘from’ address. Keep in mind that ‘www.’ counts as a sub-domain.
- Destination Address: Add your full destination URL here, including the protocol (http:// )
- Page Title (optional): What you would like to display as the title of the webpage this redirect displays at the top of the browser. Leave blank to inherit from the destination content.
- Meta Description (optional): Used for SEO – change what displays when this domain is indexed in search engines. Leave blank to inherit from the destination content.
- Meta Keywords (optional): The same as above – this is used for SEO indexing.
- Redirect Message (optional): Enter a message to be displayed during the redirection. Leave this blank for no message.
- Redirect Seconds (optional): Enter the number of seconds you would like the visitor to remain on the source address before being redirected to the destination address. This is when the Redirect Message will display.
Cloak
A Cloak redirect will retain the domain name you’re redirecting from by displaying a mirror image of the destination website.
A common use for this is to display your domain name on another web page that might have a less attractive URL. One downside to using this method is that you cannot secure the site with HTTPS as you are displaying the content of another domain name’s website, and SSL certificates can only be issued to the source website and content.
When choosing this option, you should fill it out the same as mentioned in the HTML Redirect (above), as it shares the same options as this type of redirect.
DNS Zone Requirements
The following DNS records must be within your DNS zone for our URL forwarding to function:
- Record 1
- Record Type : A record
- Hostname: example.com (your domain name)
- Value: 103.42.108.46
- TTL: 86400
- Record 2
- Record Type : A record
- Hostname: www.example.com (www.your domain name)
- Value: 103.42.108.46
- TTL: 86400
Note, that these records are traditionally added automatically by our system. However, if you have customised your DNS zone, you may need to manually add them yourself.
